|
As previously explained in this help, Appointing
Entities must have a username and password to access eAppoint. An Appointing
Entity can create a username and password by completing the registration
process and activating their account. To begin the eAppoint registration
process, click one of the "Register to become an Appointing Entity"
hyperlinks on the eAppoint Homepage and the below screen will display
listing the items you will need to complete the registration process.
If you do not have an existing email account and need to find a email
service provider, eAppoint also provides links to free web-based email
services on this screen. | ||||||
|
|
|
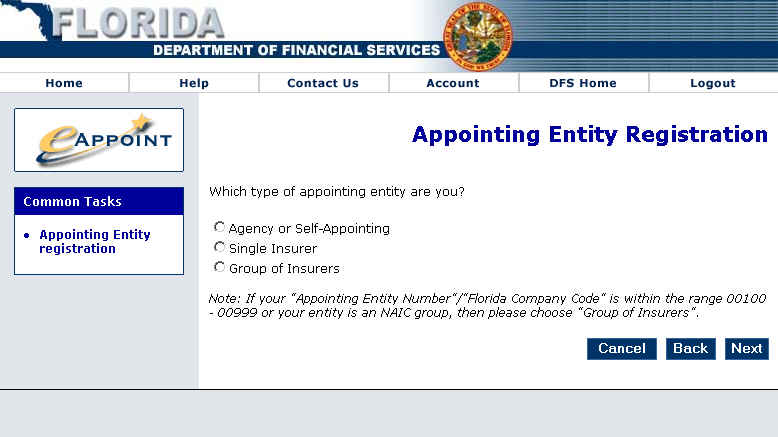
The first step in the registration process
is identifying the type of appointing entity you are. Once you select
a type and click Next eAppoint
will display the next step in the registration process for the type of
appointing entity you have selected. If you enter identifying information
that eAppoint recognizes as belonging to an entity already registered,
eAppoint will display a message notifying you. eAppoint will not permit
you to register again, instead you should contact the Bureau of Agent
and Agency Services at the telephone number provided within the message
displayed in eAppoint. | ||||||||||
|
|
|
An agency is a business location at which
an individual, firm, partnership, corporation, association, or other entity
(except an insurer or entity employee) engages in any activity or employs
individuals to engage in any activity that by law may be performed only
by a licensee. A self appointing entity is a licensee that holds a Type
and Class of License that permits him or her to appoint him or herself.
| ||||||||||
|
| ||||||||||
|
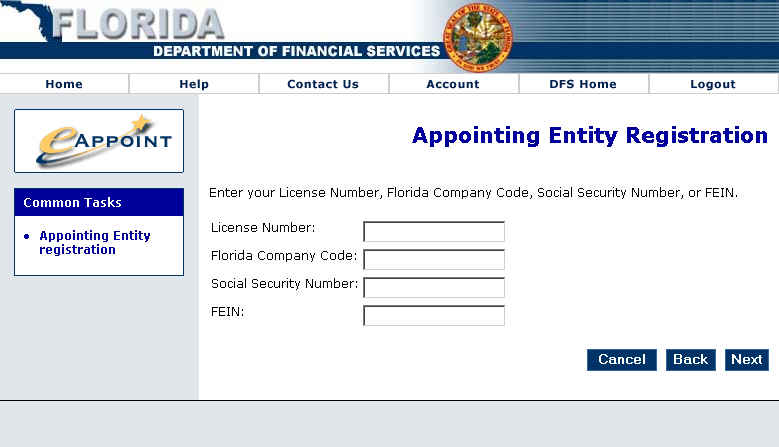
eAppoint requires agencies and self appointing
entities to enter one of the following identifiers during the first step
of registration: License Number, Florida Company Code, Social Security
Number, or FEIN. If you are using eAppoint for an agency or as a self
appointing entity and have not yet registered, eAppoint will permit you
to continue the registration process if the identifying information you
enter is found within the Department of Financial Services' records. eAppoint
displays the screen below once it has identified a record for the information
you entered. If you enter a Social Security Number not found in the Department
of Financial Services records, eAppoint will display the following message,
"The agency you searched for was not found. If you continue, a new
agency will be created. Click Next to continue or Back to choose an existing
agency." | ||||||||||
|
| ||||||||||
|
Upon clicking
Next to indicate that eAppoint has correctly identified you, you
may be given a to select address preferences. You will only have this
option if the agency eAppoint found has the proper addresses on file with
the Bureau of Agent and Agency Licensing. To select an address for eAppoint
to pre-populate as your invoicing address into your registration form,
click within the circle beside the address you would like to select. If
you would prefer not to have eAppoint pre-populate your registration form,
click within the circle beside "Do not use an address". Your
invoicing address is the address the Bureau of Agent and Agency Licensing
will be mailing your Appointment Renewal Invoices. It is important that
your invoicing address stay current, as the Bureau of Agent and Agency
Licensing will assess a penalty fee for each appointment listed on the
invoice which is not paid by the due date designated on the Renewal Invoice. | ||||||||||
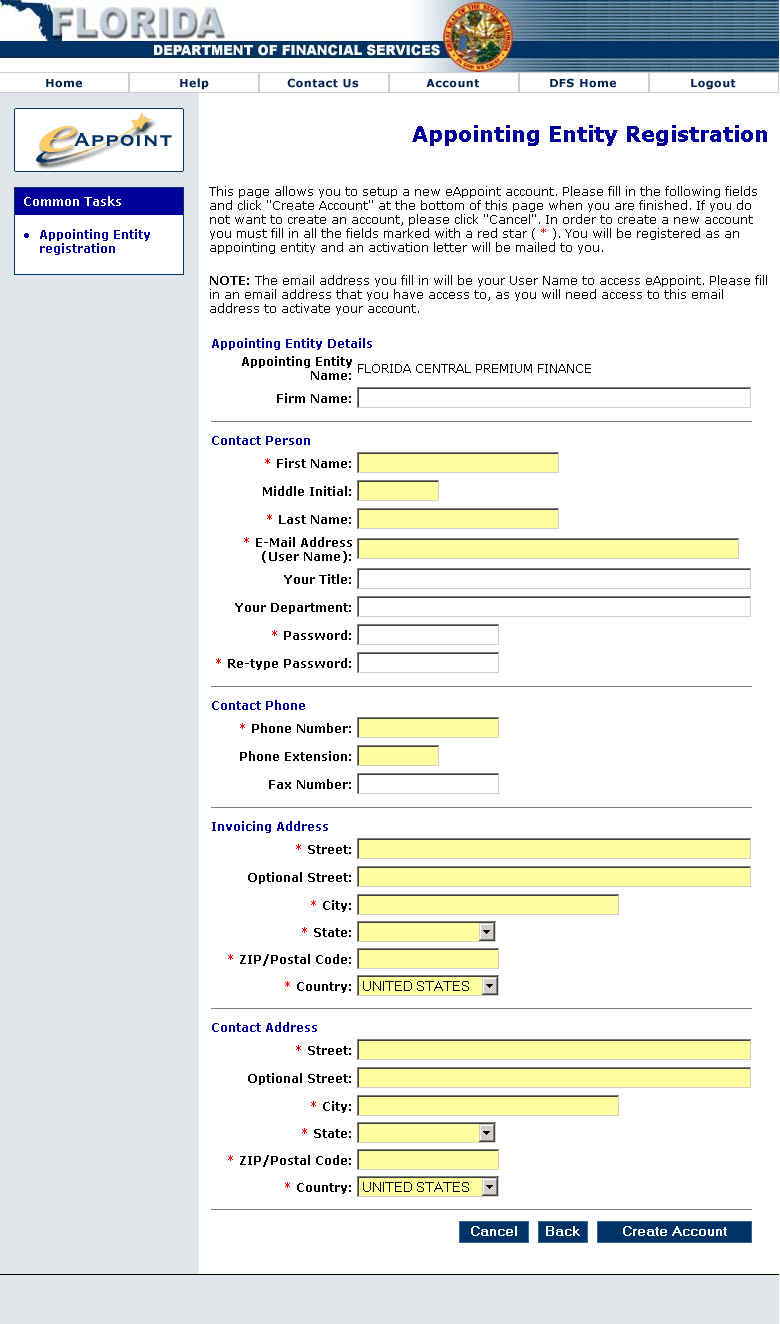
| After you have indicated
your address preference and clicked Next, eAppoint will display the below registration
form (eAppoint also displays this screen if you entered a Social Security
Number not found in the Department of Financial Services records). You
must complete the fields marked with a red asterisk (*) to proceed with your registration. The remaining
fields are optional. For information on each field on the registration
form, click
here. | ||||||||||
|
| ||||||||||
|
Upon completion of the registration process, eAppoint will send an email to the address you specified containing an activation code and web address for account activation. You will not be able to access your eAppoint account until the account is activated. A letter will also be sent to the Invoicing address you specified, also containing the activation code and web address for account activation. If you do not receive this information, please contact the Bureau of Agent and Agency Licensing.
|
|
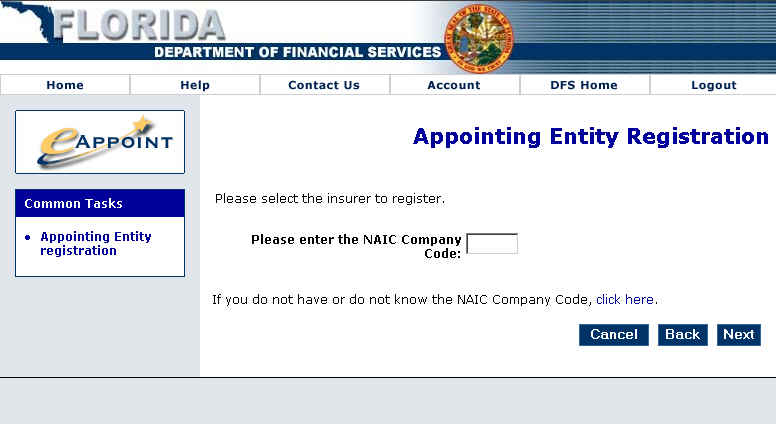
A single insurer is a CORE entity eligible
to be an appointing entity. Each insurer has a unique NAIC Company Code.
If you indicate you are a Single Insurer, eAppoint will display the following
screen for you to enter your NAIC Company Code. If you do not have or
do not know your NAIC Company Code, you can click the "click here"
hyperlink to search for the required information. | ||||||||||
|
| ||||||||||
|
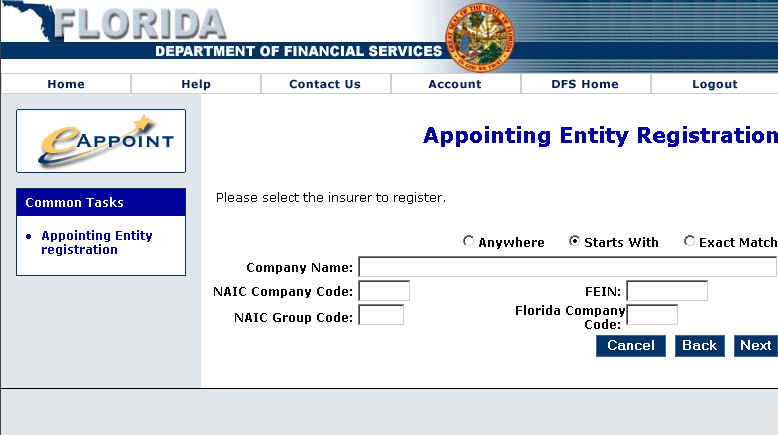
Below is the screen eAppoint displays when
you click the "click here" hyperlink to search for the required
information. eAppoint provides the functionality to select a type of search.
If you select to search "Anywhere", eAppoint will retrieve results
that include the data you specify anywhere in the data. If you select
to search "Starts With", eAppoint will retrieve all records
that begin with the data you specify. If you select to search "Exact
Match", eAppoint will only retrieve exact matches from the database.
You can search for the required information by Company Name, NAIC Company
Code, NAIC Group Code, FEIN, or Florida Company Code. | ||||||||||
|
| ||||||||||
|
eAppoint displays your search results as shown
in the image below. To select a company eAppoint has listed, click within
the circle located in the first column and the corresponding row. If your
search results do not include the company for which you were searching,
click Back to return the criteria
and begin another search. eAppoint will only permit you to continue the
registration process once you have identified a CORE Company. | ||||||||||
|
| ||||||||||
|
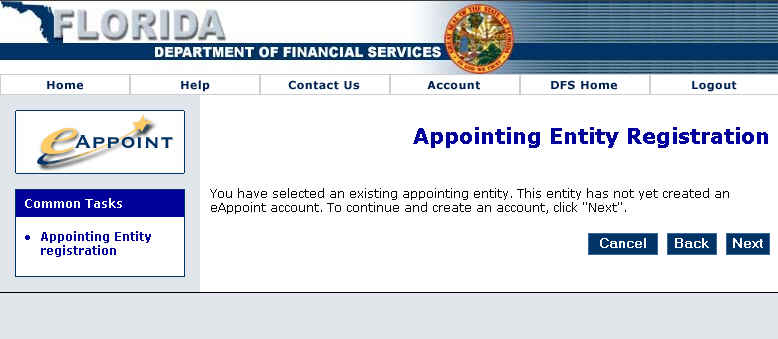
If you have entered an NAIC Company Code or
if you have searched and selected a company that eAppoint recognizes and
the company does not have an existing eAppoint account, eAppoint will
display the below screen. | ||||||||||
|
| ||||||||||
|
After clicking Next,
eAppoint will display the below registration form. You must complete the
fields marked with a red asterisk (*)
to proceed with your registration. The remaining fields are optional.
For information on each field on the registration form,
click here. | ||||||||||
|
| ||||||||||
|
Upon completion of the registration process,
eAppoint will send an email to the address you specified containing an
activation code and web address for account activation. You will not be
able to access your eAppoint account until the account is activated. A
letter will also be sent to the Invoicing address you specified, also
containing the activation code and web address for account activation.
If you do not receive this information, please contact the Bureau of Agent
and Agency Licensing. | ||||||||||
|
|
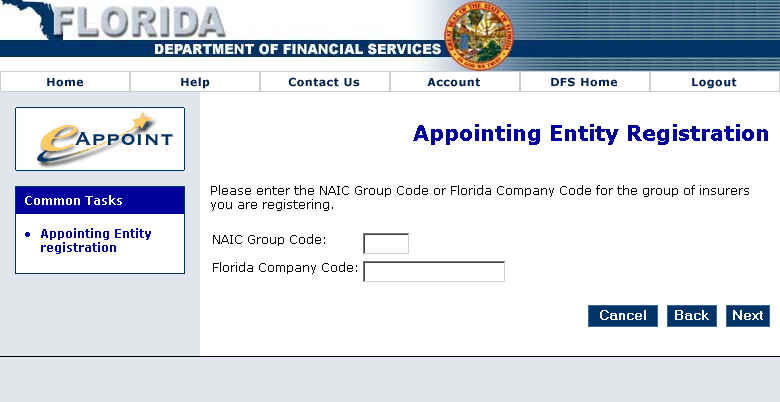
An insurer group is a group of CORE entities
eligible to file as a single appointing entity. Each group has a unique
NAIC Group Code. If you indicate you are an Insurer Group, eAppoint will
display the following screen for you to enter your NAIC Group Code. eAppoint
will only permit you to continue the registration process once you have
entered a valid NAIC Group Code or Florida Company Code. | ||||||||||
|
| ||||||||||
|
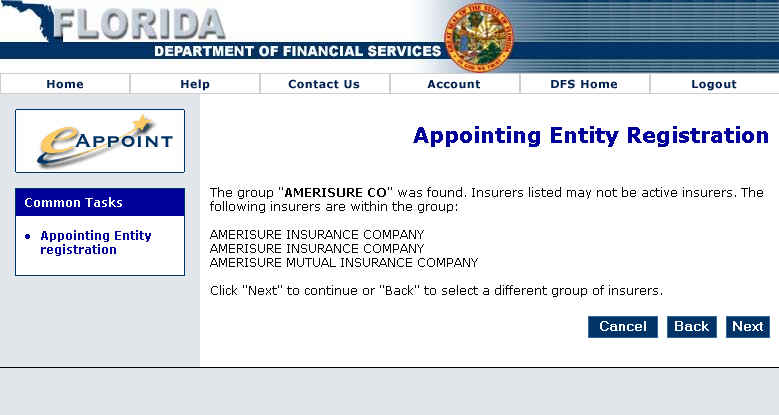
If you have entered a valid NAIC Group Code
or Florida Company Code, eAppoint displays the screen shown below listing
each of the insurers that are included in the group you have specified.
| ||||||||||
|
| ||||||||||
|
After clicking Next,
eAppoint will display a registration form. You must complete the fields
marked with a red asterisk (*) to
proceed with your registration. The remaining fields are optional. For
information on each field on the registration form,
click here. | ||||||||||
|
Upon completion of the registration process,
eAppoint will send an email to the address you specified containing an
activation code and web address for account activation. You will not be
able to access your eAppoint account until the account is activated. A
letter will also be sent to the Invoicing address you specified, also
containing the activation code and web address for account activation.
If you do not receive this information, please contact the Bureau of Agent
and Agency Licensing. | ||||||||||
|
|
Field Name |
Field Category |
Description |
|
Appointing Entity Name |
Appointing Entity Details |
The name of the Appointing Entity. |
|
Firm Name |
Appointing Entity Details |
The name of the Agency. |
|
First Name |
Contact Person |
First name of the Contact Person. |
|
Middle Initial |
Contact Person |
Middle initial of the Contact Person. |
|
Last Name |
Contact Person |
Last name of the Contact Person. |
|
E-Mail Address |
Contact Person |
Email address for the Contact Person. A valid address must be entered for verification. |
|
Your Title |
Contact Person |
Position title of the Contact Person. |
|
Your Department |
Contact Person |
Department name of the Contact Person. |
|
Password |
Contact Person |
Password provided by the user. |
|
Re-Type Password |
Contact Person |
Re-type the password in the previous field. |
|
Phone |
Contact Phone |
Phone number of the registering entity. |
|
Phone Extension |
Contact Phone |
Extension of the registering entity. |
|
Fax Number |
Contact Phone |
Fax number of the registering entity. |
|
Street |
Invoicing Address |
Street number and name of the invoicing address (where the Renewal Invoices should be mailed). |
|
Optional Street |
Invoicing Address |
Optional second line of text for the street information of the invoicing address. |
|
City |
Invoicing Address |
City of the invoicing address. |
|
State |
Invoicing Address |
State of the invoicing address. |
|
Zip/Postal Code |
Invoicing Address |
Zip or Postal code of the invoicing address. |
|
Country |
Invoicing Address |
County of the invoicing address. |
|
Street |
Contact Address |
The contact person's street address. |
|
Optional Street |
Contact Address |
Optional second line of text for the street information of the contact person's address. |
|
City |
Contact Address |
City of the contact person's address. |
|
State |
Contact Address |
State of the contact person's address. |
|
Zip/Postal Code |
Contact Address |
Zip or Postal code of the contact person's address. |
|
Country |
Contact Address |
County of the contact person's address. |
 Return to Top